Learn how you and your Scouts can make delectable Dutch oven creations at your next campout.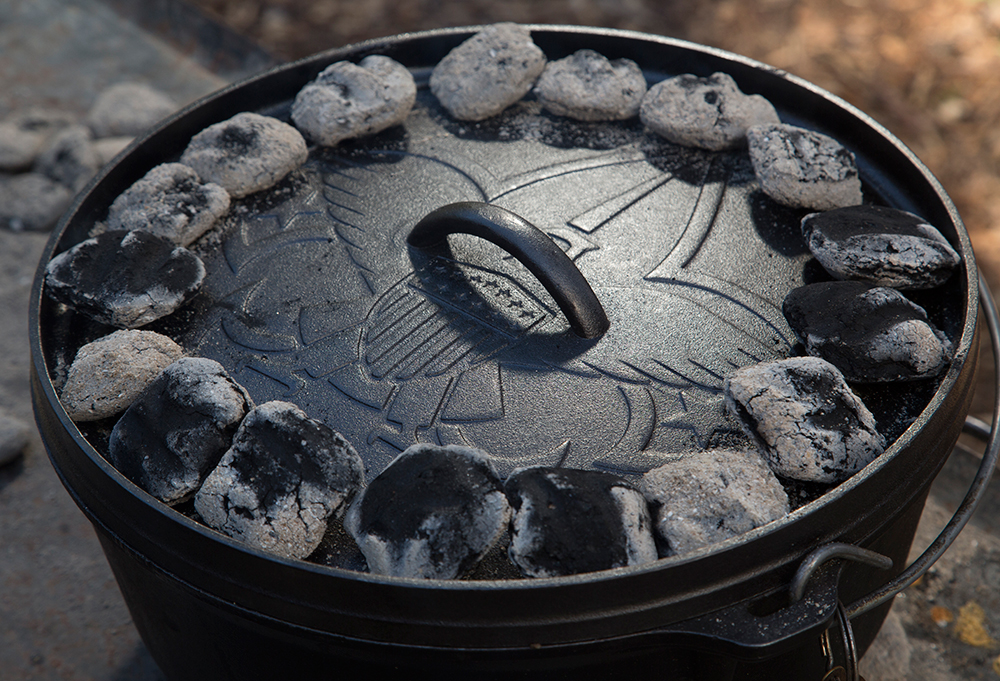
Dutch-oven cooking is as much a part of Scouting as tying knots. But learning to cook in a Dutch oven can be a bit intimidating. After all, they can be heavy and kind of messy, and the cooking style involves a little math.
A Dutch oven is such a versatile cooking tool that when you bring one to camp, it’s like bringing the kitchen from home. It can be used to fry, sauté, bake, stew, roast or slow-cook — any time of day and for nearly any type of meal. It’s not uncommon for a single recipe to involve several cooking methods using the same oven.
Sound tricky?
Fear not! This Dutch-oven cooking guide will start you on the path to creating delicious meals with your Scouts and helping them master these skills.
Getting Started
A camp-style Dutch oven — which is a cast-iron or aluminum pot — features legs that let the pot sit above coals on the ground. The lid is specially designed with a rim to help keep coals atop the oven.
Dutch ovens come in various sizes. They are most often identified by the diameter of the oven’s lid, but can also be described by their volume in quarts.
For example, a 12-inch Dutch oven is by far the most popular oven used in Scouting, and for good reason: It’s the perfect size for group cooking.
Cast iron’s dark, nonstick coating is called its “patina” or “seasoning,” an all-natural layer that continues to build as you use your oven. Many ovens come preseasoned. To help maintain the quality of the patina, wipe the oven with cooking oil before each use. The microporosity within the cast iron will trap and hold the oil, which then hardens into a sterile layer during the cooking process, offering excellent nonstick properties.
There are many different ways to bake with a Dutch oven. Some people cook directly on the inside metal surface of their oven, while others line the bottom and insides with foil or parchment paper. Some even use a device within the oven to set a pan on — this works well when baking breads that would otherwise tend to burn on the bottom of the oven.
Most often, charcoal briquettes are used to cook meals in a Dutch oven (making it easier to control cooking temperatures), but some experts use real wood coals. Take a look at the temperature chart included in this feature to help estimate the number
of briquettes needed to cook your desired dish.
Tools You’ll Need
- One 12-inch (or 6-quart) camp Dutch oven to serve eight to 12 people
- One bag of charcoal briquettes of good quality and regular size
- A charcoal chimney starter and newspaper for the charcoal, if lighter fluid isn’t used
- Matches or lighter
- Long-handled tongs for handling hot coals
- Lid lifter, a metal device for securely lifting a hot oven lid
- Heavy-duty barbecue gloves (welding gloves work, too)
- Heavy-duty foil or parchment paper, if you wish to line your Dutch oven
- Recipes and ingredients
Already a pro? When you’re ready to get cooking, check out this series of how-to videos featuring Dutch oven breakfast casserole, lasagna, pineapple upside-down cake, baked apples and more!
Turn Up the Heat
When it comes to baking, knowing the size of your oven is key. Coal count and the size of the oven directly affect the internal temperature of the oven. The larger the oven, the more coals needed to maintain a target internal temperature.
Converting recipes to work in different size ovens is actually quite simple. Use the chart below to determine how many coals are needed to achieve the temperature you desire.
Notice that baking calls for a distribution of coals between the lid and underneath the oven, with fewer under the oven than on top. Because heat rises, and the fact that your food is usually directly on the floor of the oven, having fewer coals under the oven helps prevent food from charring on the bottom.
Note that the chart assumes the use of traditional, uniformly sized charcoal briquettes and cast-iron ovens. Bring plenty of charcoal! Additional coal will be required for recipes calling for longer cooking times or when the days are windy or very cold.
Find a recipe for this delicious Dutch-oven pizza here.
Cleanup and Storage
For cleanup, a well-seasoned oven requires no more than a sponge or dish rag for wiping, a gentle nonmetallic scrub pad or spatula for scraping, warm water for washing and rinsing, and a towel for drying. Avoid placing very hot cast iron in cool water. This may warp or crack the metal.
Metal scouring pads are a sure way to destroy your Dutch oven’s coating. Detergents should also be avoided, because soap will attack the cast iron’s patina. Never use a dishwasher to clean your cast-iron Dutch oven.
After you’ve washed your oven, rub or spray a thin layer of food-grade oil over the entire surface of your cookware, including legs and handles. Store your oven with the lid slightly ajar to provide fresh air and continuous ventilation to the oven’s interior. A folded paper towel placed in the bottom of the oven during storage will soak up excess oil and moisture, and will delay or prevent gumming of the oil used to recoat the oven prior to storage.
A special thanks goes to Steve and Leslie Lovett (of texasironchef.com) for their expertise during the photography of these recipes.

Safety tips
Dutch ovens are typically very heavy and should be used only on the ground or a specially designed Dutch-oven table.
Select a cooking site away from where others are working or playing. When cooking on the ground, the area should be composed of durable, fireproof material such as rock, gravel or dirt.
Follow any special fire restrictions if they apply. Always have a bucket of water handy to rapidly douse wayward flames or extinguish coals when finished cooking.
Master Chef Contest Winners
Drum roll, please … find the winners of the Scouting magazine Dutch Oven Master Chef Contest below. Click on each winning recipe to see photos and find instructions on how to make these on your next campout. The winners will each receive a Lodge prize package, valued at $200 each.
SAVORY Category
- Winner: Katahdin Surprise by Jim Rausch
- First Runner-Up: Dutch-Oven Reuben by Emily Dresslar
- Second Runner-Up: Rib-Sticking Biscuits and Gravy by Mark Daspit
SWEET Category
- Winner: Apple Cheesecake with Caramel Streusel Topping by Lisa Blodgett
- First Runner-Up: Harvest Coffee Cake with Crumble Topping by Ken Selby
- Second Runner-Up: Chocolatey Chocolate Chip Cake with Cream Cheese Frosting by Andrea Kippes
Inspire Leadership, Foster Values: Donate to Scouting
When you give to Scouting, you are making it possible for young people to have extraordinary opportunities that will allow them to embrace their true potential and become the remarkable individuals they are destined to be.
Donate Today
I clean my dutch ovens with either a paper towel or a plastic scraper from Lodge. You can use anything plastic, but the Lodge is really ergonomic. I also use a spray can of vegatable oil like Pam to oil my ovens for cooking or storing.
When I can I clean my dutch oven with ashes from the fire or coals …I rub them around to clean the oven then empty them out wipe with crumpled newspaper and rub with bees wax..it has no smell and will not get sticky
Bees Wax is now all I use to season my cast iron with. It smells terrific, and does not go rancid. It’s a wonderful way to season your cast iron.
I use Bees Wax on all my Dutch ovens. It works great, smells nice, and doesn’t go rancid.
where do you get the bees wax?
Avoid using paper towels. The pores of the iron well actually pull lint fibers from them giving you a build up after a while. Lint free rags are a much better choice.
Look closely at labels many spray oils contain water.. you can buy an inexpensive kitchen pump oil sprayer and use your favorite oil.
Any vegetable-plant based or animal based oil will turn rancid it time. I recommend you only use a food grade mineral oil on cast iron Dutch Ovens, pots and pans. Mineral oil will keep your cast iron sweet and without the rancid oil taste.
do not use vegetable oil it goes rancid. Use Olive oil….
If you need to use an abrasive inside a seasoned oven, and do not have a clean and soap-free scrubber handy, a pumice made from vegetable oil and table salt works well.
You can also use a wadded up section of aluminum foil.
One of the best ways I have found to clean cast iron is coarse salt, scrape it clean with the plastic scraper, wipe it off, put some coarse salt (Table salt will work but not a good) in the cast iron and scrub with a paper towel, wipe the salt out and rinse, oil if needed. you will see the salt turn from white to gray as it cleans
The current IDOS pres is Debbie Hair. A new prez will be installed April 2012. Clean ovens by scraping out all food. Rinse with hot water til clean. Heat til dry. Oil if desired
If you are in a pinch to clean your Dutch Oven. We have used a little sand from the beach . It worked well. Just don’t scrub too hard. Happy Cooking. Dutch Oven cooking is the best.
If you want a non-stick surface, use flax seed oil to create several layers of seasoning.
I never had to clean the inside of my dutch oven. I get around this by lining the inside with 2 layers of aluminum foil. When I do a cake or a pie, the aluminum foil allows me to lift it right out and is also used to serve.
great idea.
I always wipe my cast iron after it’s cooled to make sure there is not an excess of oil left standing that will become a gummy sticky mess.
I always oil my cast iron hot and wipe excess as the pan cools. This way I don’t leave excess oil on the pan that will become a gummy sticky mess.
Where can I find a cookbook for dutch ovens, I have several and love them.
justdutchit.com has a great book. lots of receipies and ideas of how to use a dutch oven
The same place you got the others you have?
Ummm… That person has several Dutch Ovens….
Lodge has a really good cookbook for your Dutch oven
I’ve been using recipes on this page: http://www.everydaydutchoven.com/. Great selection.
The Scout’s outdoor cook book
By Christine and Tim Conners
I use it all the time.
The seasoning directions as given leave out one step: after washing and drying, place the dutch in a warm oven or on the stove to heat and drive out any remaining moisture. THEN wipe on your choice of seasoning. If this is the first seasoning, you’ll be able to tell it is completely dry when it changes from damp dark to grey. Doing this will also let the oil get deeper into the metal. To help keep the outside from rusting, be sure to season that, too. After that first seasoning, it’s up to you if you do the outside any more. I always do at least near the rim.
Thank you so much for the temperature guide!
My Scout Master also has a very large heavy aluminum cookie sheet that he places under everything. This allows for on the ground cooking – on dirt. Please be careful around grass as this may cause a fire – I have yet to test this but safety is essential when working with heat.
If you can find them at a local hardware store, a galvanized oil change pan works great to contain coals. They are round like a dutch oven and have 2-inch high sides to contain the coals. They are nice for winter camping – just shovel snow away and place the pan on the frozen ground.
Its hard to see, but that is what the chimney starter is sitting on in the photo.
EAB
You need to burn off the galvanizing off that drain pan as the fumes are toxic!
I use the same technique in windy conditions.
I use old water htr leak pans when I do a replacement at work.
If you want to pare it down to bare essentials, don’t pack the charcoal or the starter chimney. Do what I did when I first learned to use one and use coals from a fire. That’s what I used for years!
The Dutch Oven has come to symbolize the antithesis of adventure in some troops.
I usually don’t have a much cleaning, line the Dutch oven with heavy duty foil. If there is some cleaning I take some foil and wad it up to use as a scrub pad.
For cleaning I use very hot water I have turned my hot water heater up just to have really hot water for cleaning my cast iron peices no soap on these babys also I use the Lodge scrapers to help remove any crusty leavings and then I use the Lodge SCRBRSH Scrub Brush, 10-Inch I got from Amazon I love this brush for cleaning up
One of our favorites is lasagna. No need to precook pasta. Use a big jar of Ragu and 5hin with equal part water. Layer sauce, pasta, sauce, veggies or meat, chesse, repeat. Very easy for the scouts to make. Cook for 60-75 minutes at about 350-375 degrees. The pasta soaks up the thinned sauce nicely and everyone will love it!
My dutch oven cooking stinks… I mean it stinks like a residual smell of old campfires and old oil and old burnt on sugar from canned fillings. How can get the smell of old burnt campfires out of my new good meals? thanks
This can be fixed by ” burning it out”. place Dutch oven upside down on a hot open fire. Build the fire around the Dutch oven so that it is completely surrounded by fire. Let the Dutch oven get super hot. Pull the Dutch oven from the fire and sit someplace safe to cool. The idea here is to remove and burnout anything that is been left behind in the Dutch oven. Once it is completely cool to the touch wash the Dutch oven with warm water and then re-season by heating it to 400° and wiping the inside with oil of your choice preferably coconut oil. Your Dutch oven will be like new.
Warning if you don’t let the Dutch oven completely cool before you wash it. It will crack and ruin it.
Step 1. After a good cleaning, a vinegar treatment might do the trick. Cleaning it again with vinegar and water works if the condition of the oven isn’t in too bad.
Step 2. If the oven is really crusted, some sand paper and elbow grease may be necessary. You can take the crust off clear down to the metal and start over with the conditioning.
Good Luck, the effort will be worth it.
Carl Rasmussen
I’m looking for Blade Blackie’s Recipe for Poison Peppers
from about 20 years ago. It won the dutch oven recipe contest held by the magazine.
I do enjoy this cooking and very interested to learn more. ><)))"<*
I’ve found the site http://www.everydaydutchoven.com/ to be a great resource. Tons of excellent recipes, and he’s tried them all so he’ll give good cooking tips
Here Blade Blackie’s recipe:
https://scoutingmagazine.org/issues/0503/a-winn-blade.html
Entrée
1ST PLACE ENTRÉE
BLADE BLACKIE’S POISON PEPPERS
1 1/2 pounds thick-sliced or chunked bacon
1 medium head of cabbage
1/2 cup water to start
1 bag hot peppers (a dozen or so, depending on your tolerance for hot)
1 softball-size onion
2 sweet peppers
1 can condensed cream of mushroom soup
1 pound dried beef or favorite meat, cut into 1-inch squares
salt, pepper, garlic (cloves or powder)
Cook in a very large skillet or Dutch oven.
Cut bacon into squares, fry until golden brown. Leave grease in the skillet.
Chop cabbage into 1/2-inch strips, break apart, and add. Fill skillet with cabbage and add 1/2 cup water. As cabbage cooks down, add rest of cabbage until all has been put in. Cover the skillet but uncover it occasionally to stir cabbage to keep it from sticking. Cook until cabbage starts to get limp.
Cut the onion and sweet peppers into small pieces and add, keeping some of the strips of each for garnish (if desired). Add the meat squares and the can of mushroom soup. Add water as needed, enough for a broth that allows soup to blend easily and keeps stock from sticking. Add salt, pepper, and garlic according to taste, mixing well. Cook until sauce is thick.
Determine the amount of “hot” you want to achieve and add hot peppers, leaving the stems on the peppers. (This keeps the seeds inside the peppers.) When stirring, do not break open the peppers.
Cook until sauce is smooth and thick, stirring occasionally. Garnish the top with pieces of onion and the colorful hot and sweet peppers. Simmer about 15 minutes.
This dish can be served by itself or on bread or rolls with butter for that extra taste boost.
Serves 12 to 16.
Has anyone tried those chain mail scrubbers?
I love the chain mail scrubbers. The work on tough messes, but don’t seem to harm the patina. Plus they can get really dirty, then soap cleaned to be like new for the next trip.
Yes. I like it, got one as a present from a parent after a successful year.
Wow! This is a wonderful cookbook. It gives me a nudge to get cooking! It is written with such an enthusiastic vibe. It is definitely going to be used both inside with my cast iron pot in the kitchen and outside at the campfire when camping. Thanks.
never clean with water….. use salt and a gunning sack and leave a 1/2 of cup of salt in it. use a scrapper to get the big stuff
This is a great article! During my time in Scouts while we were out camping 30-40 days a year or more we always used Dutch Ovens for dessert. Get the fire going, grill and cook, and then once the fire wood was broken down to coals. We’d make all kinds of cobbler, some pineapple upside down cake, all kinds of desserts. Put it in, place some coals on the top, and let time and heat take care of making incredible dessert. To this day still some of the best meals I ever ate were 20+ years ago in Scouts.
How long does the dutch oven stay at temperature with the original coals on it and how often and how many coals do I need to add coals to keep it at temperature?
That’s a little tough to answer – kind of like answering “how long is a piece of string?”. You develop a feel for charcoal usage that only comes from experience. It’s not an exact science. Generally, if it’s warm and not windy, the initial coals are good for maybe 15 to 20 minutes or so. If it’s windy they don’t last as long. The coals start turning to ash and the hot part gets smaller and smaller as time goes on. The ash builds up and will smother your new coals, so you’ve gotta brush it away. I generally start another set of coals after I get the meal going so they’re ready to put on after 20 minutes or so – this keeps things hot and cooking. For something that bakes fast like cornbread or chocolate cake I can get by with two loads of coals. Slow cooking things like casseroles can take three or four depending. Again, it takes some time to get the feel for it. I recommend that you practice making meals at home in your backyard before you try to do it camping 🙂 Be patient and have fun with it!
Great article, especially the little briquette to oven temperature chart!
My favorite thing my father used to make was spicy dutch oven chili. I tried making slow cooker chili, and it just doesn’t take the same as the trusty ol’ cast iron.
Hi-
In these modern times, it seems some shortcuts are taken in the manufacture of ‘Dutch’ ovens. I own and use four good ones, and I’ve discarded (after use) a set of four bad ones. All of my good ones are made by Lodge. I have seen good ones produced by another firm. All imported ovens I have seen or purchased are incorrect.
The difference is the fitting of the lid. A proper Dutch oven has a lead that forms a good steam seal when simply resting upon the rim of the pot. With this proper seal, that comes from a smooth planar rim and a smooth planar mating surface of the lid, the Dutch oven is actually a pressure cooker. The pressure builds up because the steam can only escape when the pressure lifts the heavy iron lid.
Cooking times for meats and cakes is very different when comparing a proper Dutch oven to an import version with a poorly sealed lid. When cooking at high altitude, the extra pressure is a very big help.
I don’t work for an oven company, but I’ve used them for the last 20 years.
Chad
There should be an issue with the reference to Lighter fluid in the above article. Scouts NEVER use artificial accelerants for their fires!
Hi,
I’m a long time Scout/Scouter and avid Cast Iron Cookware user/collector. This is a great article. Especially the briquette chart, but there’s a couple myths/mistakes when cleaning and storing cast iron that needs to be updated.
It’s a common misconception that you can’t use soap on cast iron. It goes back to the days where soap contained Lye which will strip cast iron. Modern dish soap is much gentler and is generally safe to use on cast iron. I will use soap on rare occasion if something is really stuck on and when hot water and a plastic scrapper/brush won’t cut it. I’ll also use soap and hot water when oil builds up on the Dutch Oven and gets gummy as a result of using too much oil or applying oil when the cast iron is cold, or if the oil goes rancid from improper application before storage. Regardless, I will always do a coat of stove top or oven seasoning with cast iron seasoning (High Temperature Oil or preferably a bee’s wax based seasoning blend like Easy Beezy, Buzzy Wax or my own blend of CI season w/ Avocado Oil, Grapeseed oil, and bee’s wax).
Another common mistake is not heating the cast iron above the oil’s smoke point after applying oil before storing. If you apply oil to your Dutch Oven cold and put it away, yes it will prevent rust, but the oil will go rancid before the next use and cause a gummy build up. The oil by itself is not what makes your Dutch Oven non-stick and protects from rust. It’s the polymerization that’s formed from heating the oil to the smoking point and then dried onto the cast iron that creates the Seasoning/Patina. Always wipe off the excess oil before heating & putting away your Dutch Oven so it doesn’t go rancid. If done right, your Dutch Oven should be dry to the touch when cool before storing.
The other thing that helps cleanup/maintenance, is use of an aluminum liner when cooking acidic or sugary foods. Acidic foods like tomato sauces, Chile Verde, citrus based foods, and other recipes that have acidic ingredients can strip the seasoning from your Dutch Oven. If your Dutch Oven is well seasoned, it should survive from time to time, but you’ll want to apply and bake on another layer or 2 of cast iron seasoning after use. When baking sugary foods like Monkey Bread, Cobblers/Dump Cakes, or Pineapple Upside Down cakes, the sugar tends to caramelize and burn sticking to the bottom and sides of your Dutch Oven making cleanup difficult. Parchment paper liners work great for breads, but wet and sugary foods tend to soak through the parchment and burn to the bottom. With aluminum liners, you simply slip the liner out, wipe out the pot and lid with a paper towel and apply thin layer of oil/seasoning, heat to the smoking point, wipe off the excess and let it cool off before storage. This can be on the grate of your campfire, over coals, or on your camp stove.
When cooking foods that aren’t acidic, baking or foods that are fattier, like the much loved Mountain Man Breakfast, I don’t use a liner as the butter, bacon/sausage grease or cooking oil does a great job actually helping to build up the seasoning while cooking. The key is to not skimp on your cooking fats and always pre-heat your Dutch Oven before adding your cooking oil, and not to use high heat when sautéing to prevent your food from sticking. I usually just wipe out the Dutch Oven with a paper towel when I’m done cooking.
Also, I agree that using paper towels in the Dutch Oven to help absorb moisture for storage is a great idea, but more importantly, you should fold up 2 or 3 and place them between the lid and the pot to allow moisture to escape and act as a wick. If you have a quality US Made Dutch Oven like Lodge or the now defunct Birmingham Stove and Range (for older troops that have these passed down), it should have a fairly tight seal that doesn’t allow air to breath. The Camp Chef Dutch Oven’s made overseas have a more sloppy fit between the lid and pot, and even have a notch to allow a thermometer to be used which will allow for more air flow, but will still benefit from placing a few folded sheets between the lid.
There hasn’t been an update to the BSA Fieldbook since 2014 and I think there is a much needed updated regarding cast iron use, care, and storage.
Keep up the great articles and cook on!
I have used most all of the cleaning methods mentioned above. My current favorite when my cast iron needs scrubbing is to use a Lodge brush. If you are considering or have one, I recommend screwing in a small screw through the plastic into the wood handle. This mod will save you unwanted frustration when the scrubber head pops off at the most inopportune time.