A Walk on the Wild Side
By Karen Berger
Illustrations By Amy Bryant
Hiking trails aren't always on smooth, level ground. Sometimes you have to climb, scramble, jump, or slide to reach where you are going.
Hiking is more than a walk in the woods. Depending on your stomping grounds, it can include climbing, bouldering, sliding, jumping, and crossing snow or water. These maneuvers take some getting used to—and a bit of skill.
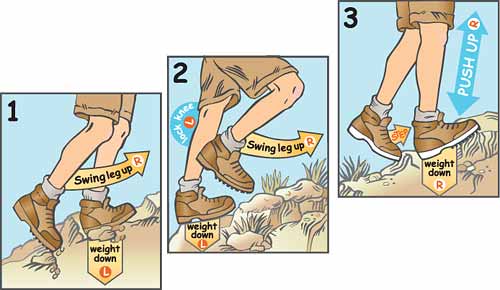
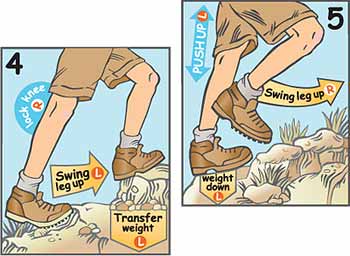
The rest step
The mountaineer's "rest step" (illustrations 1-5) is your greatest ally on steep ascents. With every step, you briefly transfer weight from your leg muscles to the skeletal system. It takes a bit of practice, but if done correctly allows you to climb farther without excessive tiring. Here is how it works:
Step forward with your right leg while keeping your weight on your back (left) leg and momentarily "locking" the back leg in a straight position.
Swing your left leg forward to take the next step, while locking and transferring your weight to your right (now the back) leg.
Repeat the process with each step, always putting your weight on your locked rear leg.
Rock scrambling
This is a gray area between hiking and climbing. While not exactly walking, you're not technically climbing either, since most hiking trails don't require the use of ropes or other gear.
• Keep your pack as light as possible, with the bulk of the weight low. (An internal frame pack is less likely to snag on rocks and branches.) Stash any gear you usually hang outside your pack inside, so it won't get caught or torn off.
• The lower body powers and the upper body balances. Keep your knees bent and your weight low.
• Test handholds and footholds. Give roots, vines, and weeds a good tug before committing your weight to them. Other hikers may have already loosened them by using them as handholds.
Rocks may not be as secure as they appear. If you must step on a rock, try to step in the center of large rocks (larger than a frying pan), which are less likely to roll and pitch you off balance, causing you to fall.
• Before moving a hand or foot into a new position, make sure you have three stable points on three solid holds. This means securing two feet and one hand or two hands and one foot.
Crossing scree
Scree is fine gray rock on the upper slopes of high mountains. It moves and slides underfoot like walking on sand.
• Uphill: Tackling scree straight on is inefficient, like going up the down escalator. For best results, zigzag across the slope, keeping as much of your boot as possible in contact with the ground.
• Downhill: This is like skiing on rock without the skis, so choose a slope with a fairly even grade, without large chunks of rock littering the fall line. Wear gaiters (to keep your boots from filling up with rock particles). To get a feel for the slope, start slowly, then jump from one foot to the other, landing on your heel while letting yourself slide. Keep your knees bent, and be ready to shuffle your weight back and forth to retain your balance.
• Climbing: Look for protruding rocks that may provide secure footholds. Two other techniques include kick-in steps (in deep scree), or duckwalk with your feet in a toe-out position to increase traction.
Boulder travel
Boulder fields require you to step from rock to rock (which may or may not be secure), while ascending or descending steeply. On official trails, the best route through a rocky maze may be marked with wands, painted blazes, or stone cairns (piles of rock).
The surest method for beginners is to "test and pause"—test the footing, step, then pause to test again. Trekking poles help with balance and make stepping from rock to rock easier on the knees.
Crossing snow and ice
In late spring and early summer, high mountain trails are often blocked by snow or ice fields, which can make for a dangerous crossing.
Before setting out, always check with ranger stations and land managers regarding snow conditions. For summer hiking, trekking poles are usually sufficient, but in other situations an ice ax and crampons may be recommended or required.
• Ice axes. It's important to practice self-arrest maneuvers with an ice ax before you need it. Group practice can raise everyone's skill and confidence.
Hold the ax in the uphill hand with the back of the ax closest to you. If you fall, bring the pick up to shoulder height, turn toward it, and plunge the pick into the snow. To avoid falling on the sharp point of the ax, be sure to bring the ax across so that it lies diagonally under your body and the point is not directly underneath you.
• Crampons. Full-length mountaineering crampons, spikes attached to the soles of boots, are rarely needed by hikers. Instep crampons are smaller and lighter; they fit into a boot's instep and are held in place by straps.
• Glissading. This means simply sledding on ice or snow without the sled—you sit down and slide with your legs directly in front of you. Hold your ice ax at your side, so you can roll over and dig in if you start going too fast.
Never glissade without wearing long pants. The friction of snow or ice can seriously abrade your skin.
Fording a stream
Crossing mountain streams in late spring and early summer can be especially challenging when they are swollen with melting snow.
Don't assume a trail leads to the safest crossing. A crossing that is safe in midsummer when the stream is low may not be safe during late spring runoff.
Scout both upstream and downstream to find a place where the water is shallower and slower. You will usually find this in a flatter area where the stream widens.
Most hikers have no trouble crossing shin-deep water, but water above the knee can throw you off balance.
Never cross fast-running whitewater. If you trip, your foot could be caught among the rocks and you could be held under.
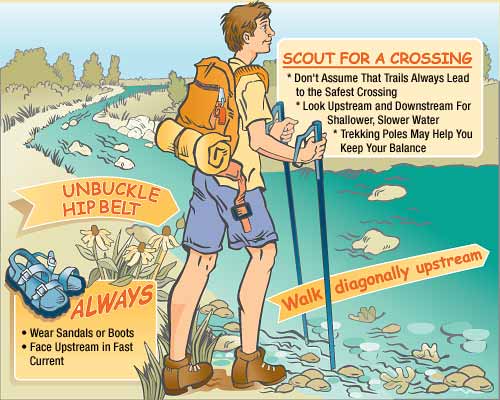
Before stepping into the stream, unbuckle your pack's hip belt so you can quickly shuck the pack if you lose your balance.
In a fast current, face upstream. It is easier to keep your balance while facing the current than it is if the current is hitting you sideways. Walk diagonally upstream toward the opposite bank. Trekking poles can help you keep your balance.
Always wear some kind of foot protection. Sandals such as Tevas will protect your feet and dry quickly. If you don't carry sandals, wear your boots.
Before crossing, take off your socks and remove the insoles from your boots. On the other side, put the dry socks back on your feet and the liners back in the boots. Your feet won't feel as wet, and the boots will dry faster.
Karen Berger is the author of 10 books. Her most recent is Hiking Light Handbook (Mountaineers Books, 2004). Check out her adventures at her Web site, www.hikerwriter.com.
October 2004 Table of Contents
Copyright © 2004 by the Boy Scouts of America. All rights thereunder reserved; anything appearing in Scouting magazine or on its Web site may not be reprinted either wholly or in part without written permission. Because of freedom given authors, opinions may not reflect official concurrence.